Uploading Photos
There are 3 different ways and locations to which you, your staff, and community can upload photos to different categories. Be advised you will only be able to upload photos that are .jpg, .jpeg, and .png. (Note:Uploading content that is unsupported by our site may result in corrupted files.)
Follow these steps to successfully upload and manage your photos.
Uploading Photos using the new uploader!
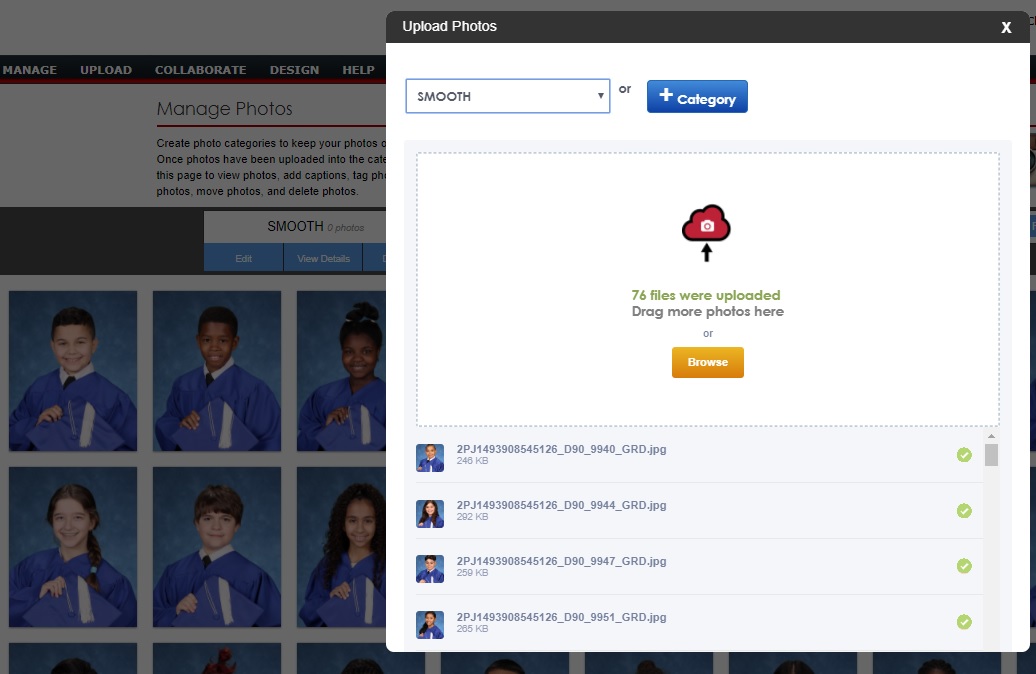
We have added a new photo uploader that does not require flash! It shows thumbnails of the pictures you are uploading, and it is so easy to use that you just drag and drop photos from your computer and they will upload automatically!
- Click the "Upload Photos" option from the "Upload" tab drop down menu. You may also click the "Manage" tab, select "Manage Photos" and click the "Upload New Photos" button. A pop up will appear.
- Choose the category you wish to upload your photos to by clicking on the “-- Select Category --” drop down menu. If you don’t have any categories you may need to click the “+Category” button.
- From the folder containing your picture files, simply select the photos that you wish to upload then drag and drop them into the uploader where it says "Drag Photos Here". You may also select your files by clicking on the "Browse" button. (Note: The Drag Photos Here area is grayed out and won't work unless there is a category selected.)
- You can select multiple photos and upload them at the same time. The pictures will automatically upload once dragged/selected! (Note: It’s best to store your photos in a familiar location on your computer.) You can see a green check mark on the side of each photo when the upload is successful.
- Once your files have completed the upload process, you will be able to preview your photos in the background
- You can click on the "X" on the upper right corner of the uploader to close it when you're done.

Upload Using EDOnline Page Designer
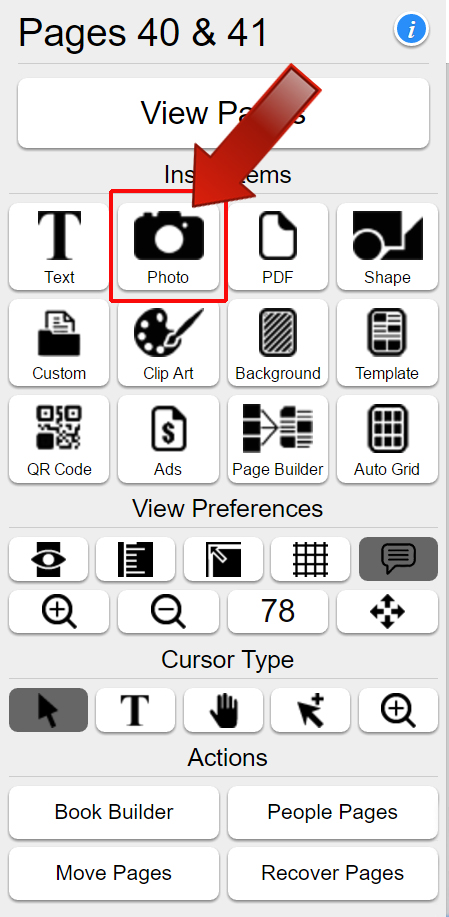
For Users who are creating their pages using the software "EDOnline" you have the option to upload photos directly from the page designer. (Note: You must be working on a page within the designer in order to access this function.)
- Click on the "Insert Photo" button. (Note: this button looks like a camera.)
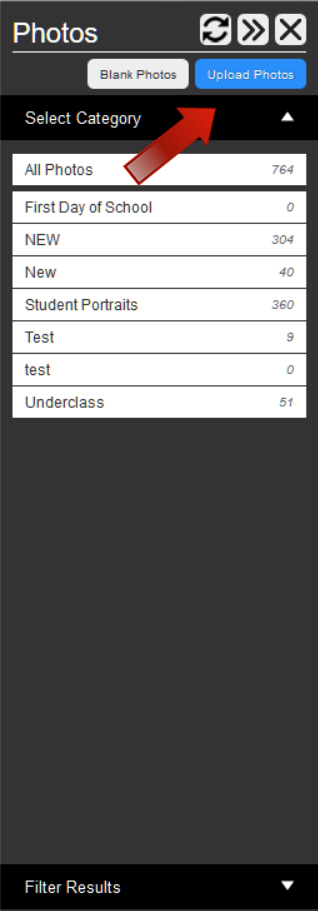
- Click the "Upload Photos" button.
- Select the category to where you want your photos to upload.
- Click "Select Files" to browse your computer for the photos you wish to upload.
- Once you have selected your photos, click "Start Upload".
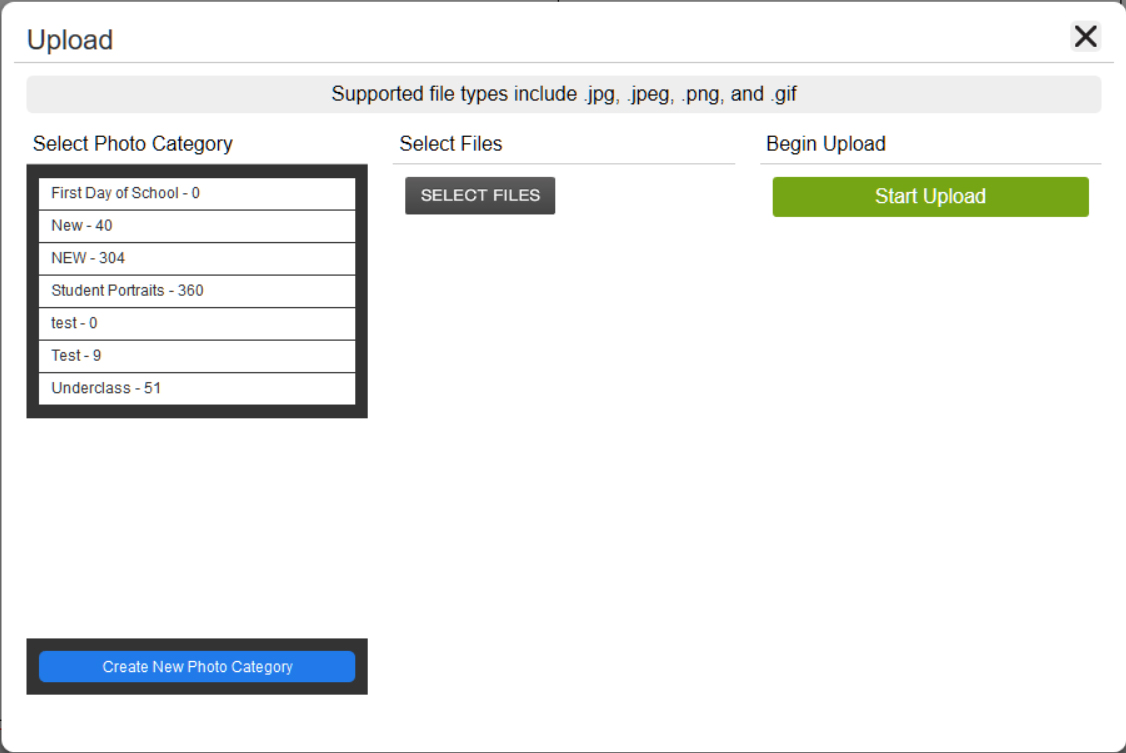
Need to create a new photo category? That's no problem at all. You can also create a new photo category in the same location as you upload photos. Below your categories click "Create New Photo Category." Follow the steps and enter in the information to create your new photo category.
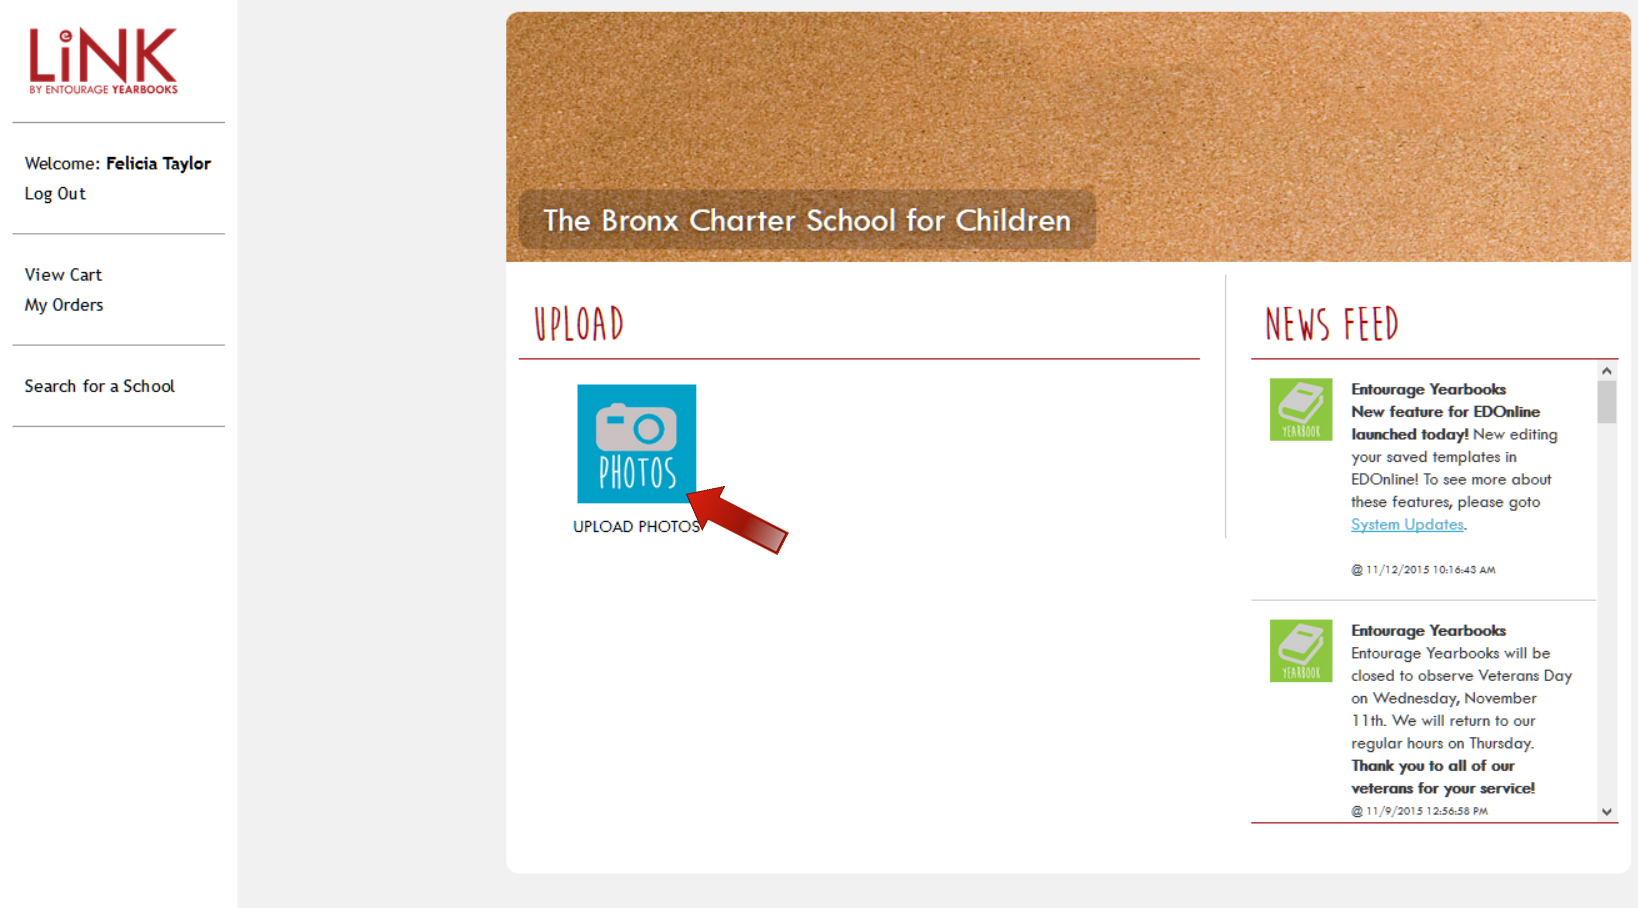
Upload using LINK!
Your school community can get involved with uploading the photos they wish to see in the yearbook by registering with LINK!. Administrators can set up the yearbook homepage to allow users to upload photos even if they have no involvement with designing the yearbook pages. General users can upload approved photos by following the "Upload Your Photos" instructions.
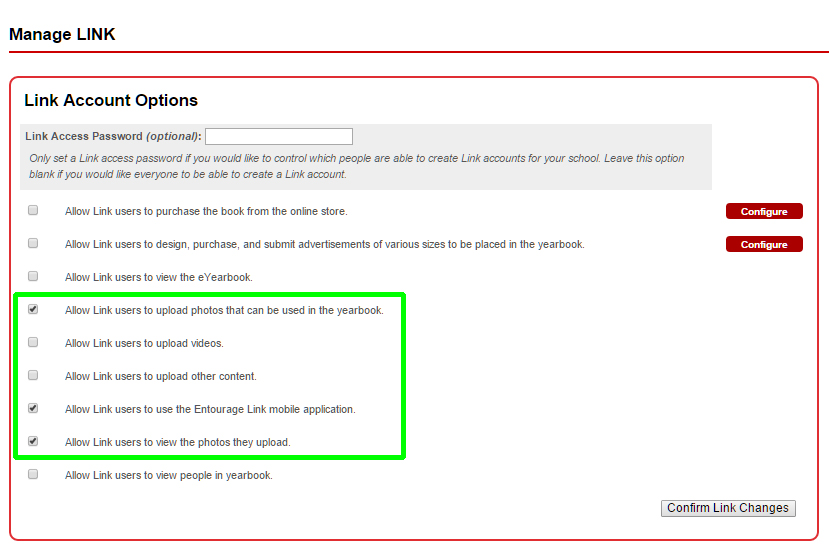
- Click "Manage LINK" in the Manage Tab.
- In the "Manage LINK Account Options" you have different selections that can be included in your yearbook homepage.
- Check "Allow LINK users to upload photos that can be used in the yearbook" for general (Mass) Users button
- An "Upload Photos" button will be added to your homepage. (Administrators can assign a password for general use to keep track of what photos get uploaded. Every time someone uploads photos to your account you will receive a notification within your News Feed.)
- Click "Confirm LINK! Changes."
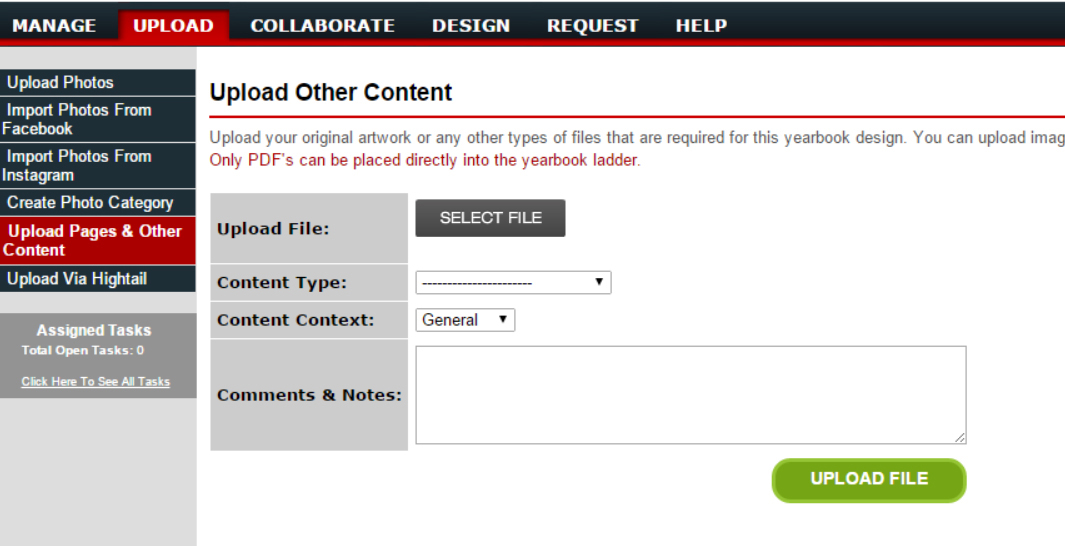
Upload Other Content:
Upload your files that are required for the yearbook project. Along with photos you can upload other content such as PDFs, documents and videos. If you have multiple files over 50mb and your internet connection isn’t strong then you may want to use our HighTail dropbox. (Note: Only PDF's can be placed directly into the yearbook ladder.)
1. Go to the Upload tab and click "Upload Pages & Other Content."
2. Click the "Choose File" button to browse your computer for your file.
3. Select the "Content Type:" This helps to identify your content and to better organise the upload.
- Cover design
- Page content
- Book Proof
- Image/Clip Art
- Documents
- School Logo
- Other Type of Content
4. Select the "Content Context:"
- General
- Cover
- Category
5. Enter any additional description to the "Comments & Notes:" section.
6. Click "Upload File."
7. Once your upload is complete you can click the link to see a quick preview of your upload.
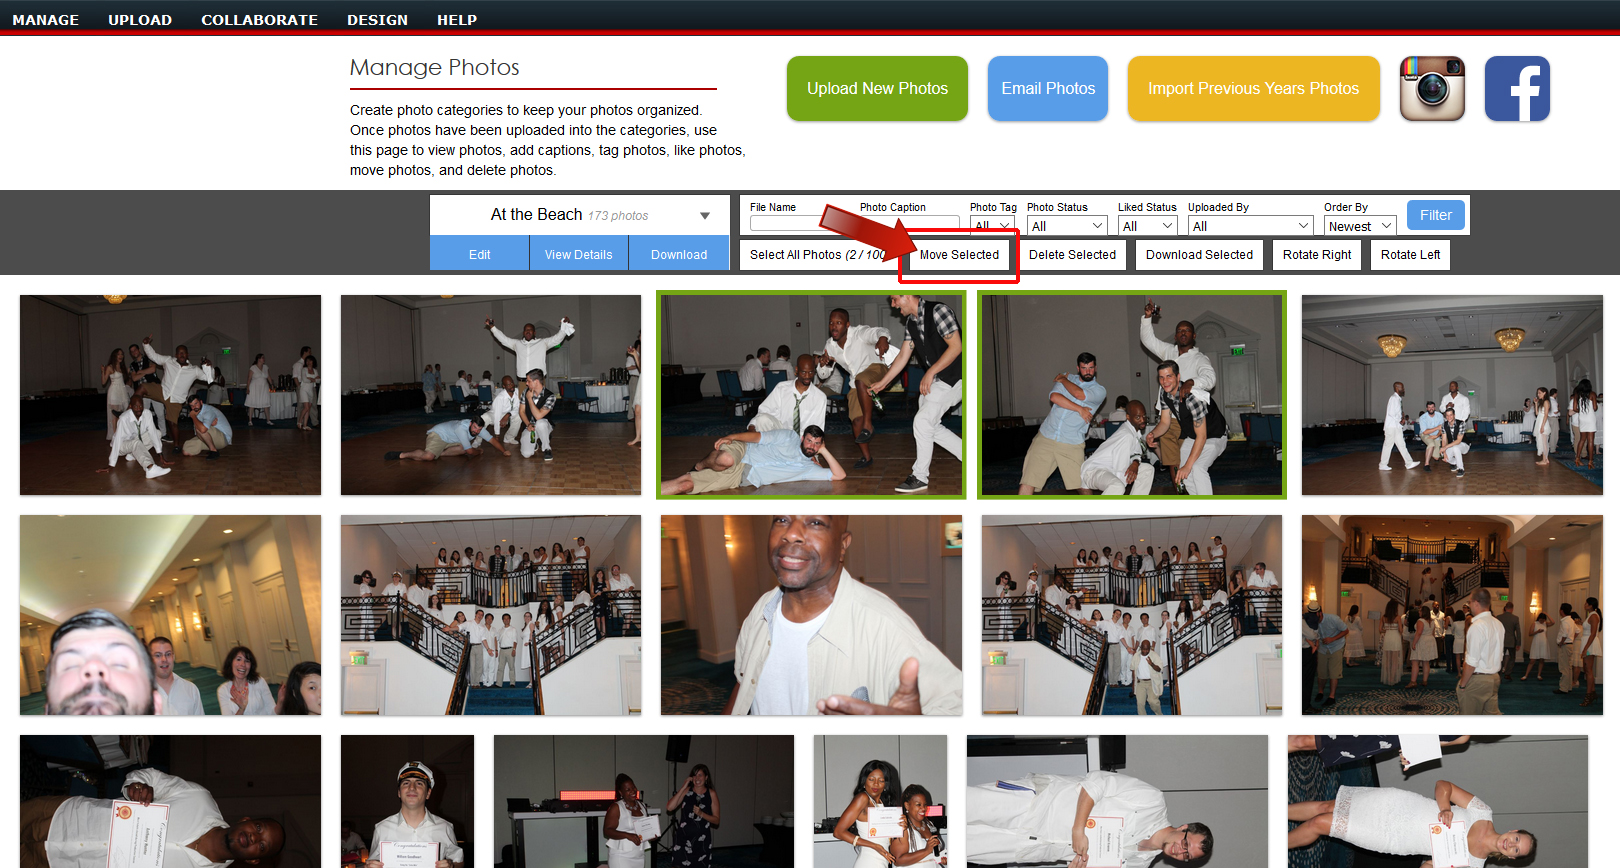
Managing Your Photos:
You can organize your photos by category and search by the following filters:
- File Name
- Photo Caption
- Photo Tag
- Photo Status
- Liked Status
- Uploaded By
- Order By
Select a category of uploaded photos to view the different options of organization.
- Select All - This option selects all the photos within a category.
- Move Selected Photos - Select 1 or more photos to move to a different category. Check the photos to be moved and click "Move Photos." Select the category the photos will be moved to and click "Move."
- Delete Photos - Choose the photos that you wish to discard and click "Delete Photos."
- Edit Category - You have a category that you wish to rename. Select the category and click "Edit Category" to rename it. Once you are satisfied with your new category name click "Done."
- Delete Category - Select the category that you no longer wish to keep and click "Delete Category." (WARNING: Once you delete a category with its contents there’s no way to retrieve those photos again so be sure this is what you want to do.)
- Tag Photo - Add Photo Tags to pictures.
- Add Photo Captions - Administrators can allow users to view and/or change the captions for each photo uploaded by them and other users.
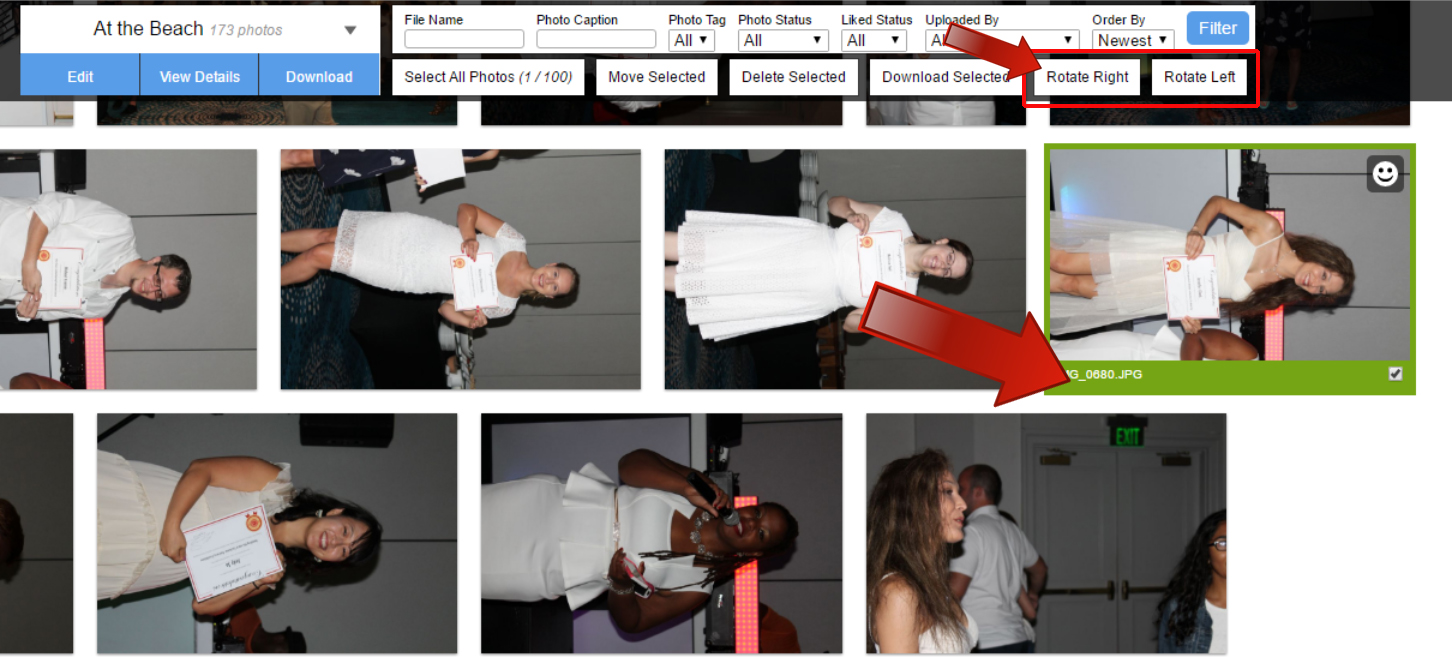
- Rotate Photos - This function allows you to rotate your photos left or right.
- Email Photos - For your created categories a link has been created that you can share with others. Click the Email Photos button to locate your links.
- Import Previous Years Photos - With this newest feature users that have had previous accounts with us can retrieve their past project photos.
- Upload via Instagram - Import your photos from your Instagram account to be used in the yearbook. (Apologies: Feature Temporarily Unavailable)
- Upload via Facebook - Import your photos from your Facebook account to be used in the yearbook.

Manage Uploads & Other Content
When managing your uploaded files you can select, download, upload or delete. Click on "Manage Uploads" from the Manage Tab. You will be directed to your uploaded PDFs and other documents. You can view "All File Types" or click on a category to view those particular pages.
Category Types: Content, Cover, Document, Image, InDesign, Logo, Other, Pages, Proof, Student Data, Video

Related Articles
Student portrait photos (People Pages)
Getting Started From the page designer on the bottom left panel click on the button “People Pages” For each step there are quick video tutorials to help you through the stages in creating your People Pages. We recommend you preview each video if you ...Importing Photos From Your Google Drive
Another avenue of uploading your photos that is available is through your Google Drive! The following steps will allow you to access and add your favourite school memories to your yearbook account directly from your Google drive. (Note: You will need ...How Do I Provide the Photos?
Photos can be provided by uploading as part of your yearbook directory of folders. They should be provided as the original graphics files, e.g., .jpeg, .tiff, .pdf, .psd, .png, .ai or .eps files are all acceptable. Note: we cannot accept Publisher ...Formal student photos
Many schools choose to include the formal class, group or individual photos taken during the year, in most cases they will be taken by the company called Photolife. YOLO can source the photos directly from Photolife, this will ensure that we have the ...How do I upload photos?
Click on the insert photo tool, then go to the upload Photos Button. Click the 'Start Upload' button once you have selected the photo category and file. You should then see your new photo in the category.